Installing Google Analytics is not just placing your code on all pages & boom… all the data starts populating.
Google Analytics will only start tracking pageviews by default when you place the code.
What if you have a single page website? or multiple website in user funnel? Ajax Forms? Iframes?
It becomes much worse, as you may now have to edit the code & configure some settings in analytics interface.
One of the most important part is to understand
- What does each google analytics setting mean?
- What will happen if I enable/disable particular setting?
- Which settings should I use for a particular industry?
We’ll start with step by step method of setting/checking google analytics account & why you should you enable/disable particular setting.
Google Analytics Audit Checklist
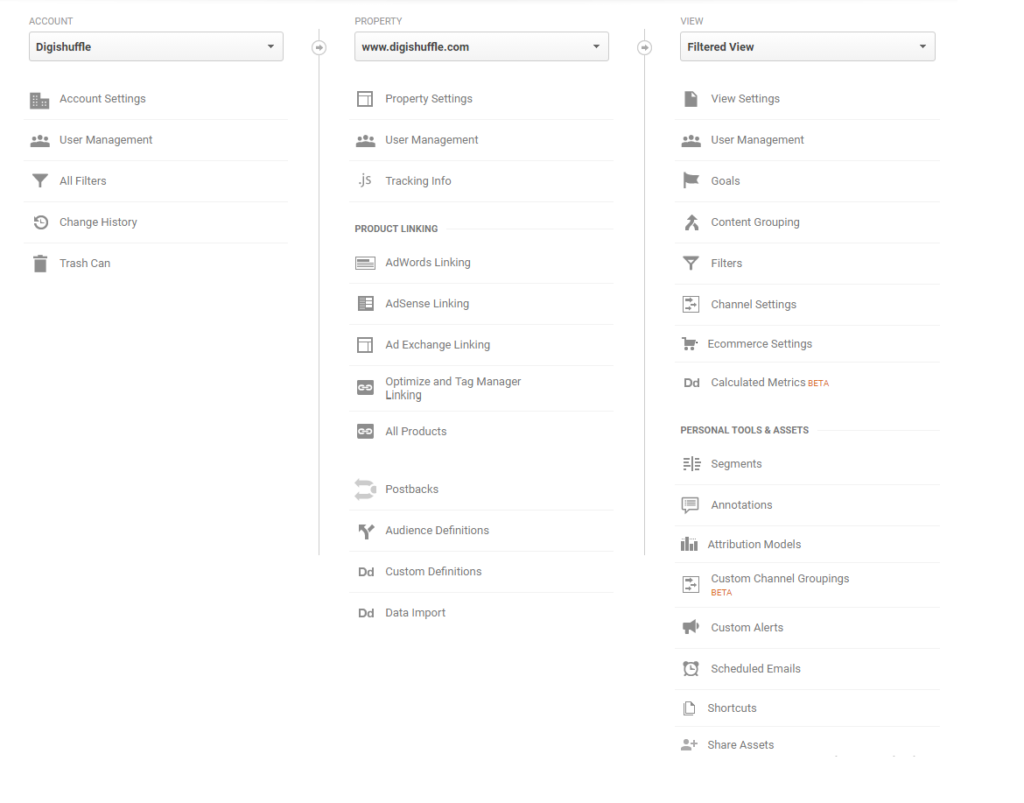
Google Analytics has a hierarchy where Account is at the top of the hierarchy then comes the property & lastly View.
Here’s how google describes it.
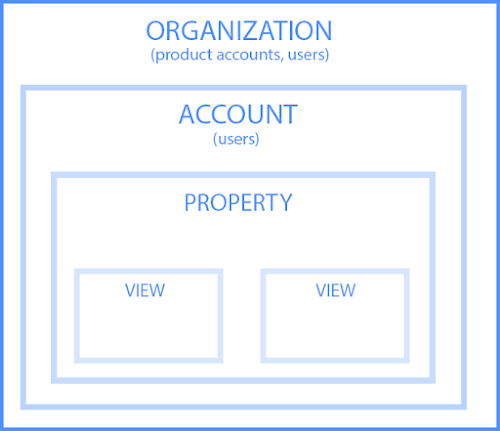
Account : You need to have atleast one account.
The Account Owner (having edit access) has 2 major powers.
- He/She can delete the whole account, along with the data.
- He/She can access the ‘change history’ tab which has all the account changes made by different users.
Make sure you give access to only trustworthy or the relevant users in the organization.
Note: The data is still kept for 35 days in the trash can until then it can be covered,atfer that it’ll be deleted permanently.
Property: You can setup up different properties for Website, Apps, Kiosk, etc
If you have different websites (domains or sub-domains, shooping carts,etc) or apps, you can create different properties.
Eg: www.example.com, blog.example.com, dev.example.com, localhost,etc
You can create 50 properties per account & different properties will have different analytics codes.
Views: You can have different views as per your requirements.
The data in the views are non-retroactive. i.e data will collection will only start after creating the view.
So, you it’s recommended to create the following views.
- RAW view. (No filters applied)
- Filtered View. (Apply IP exclusion, Exclude Spam & Bots,etc)
- Test View. (To test the ecommerce setup, cross domain tracking setup,etc)
- Mobile View. (Filter only traffic via mobile)
- Country Filter. (Fore sites having international traffic).
Views have a limit of 25 per property. Also, they can be deleted.
So, why not use & make a worth it?
Do You Handle Multiple Google Analytics Accounts?
If you work in an agency or as a consultant/freelancer, chances are you need access to multiple accounts.
Here what you can do & don’t do
DO:
Create a New account for the every client with their organization ID.
Or create with your ID & give them account admin access.
Reasons: When the client leaves, you can hand over the access easily without interfering with the analytics code.
DON’T DO:
Create account with your own agency ID & then create a new property for every clients.
Reasons: After the client leaves, you’ll need to create an account with their ID & move the property from your agency account to their account.
Now, lets look at the
- Account Setup
- Property Setup
- View Setup
Google Analytics - Account Setup
Account Settings - Check #1
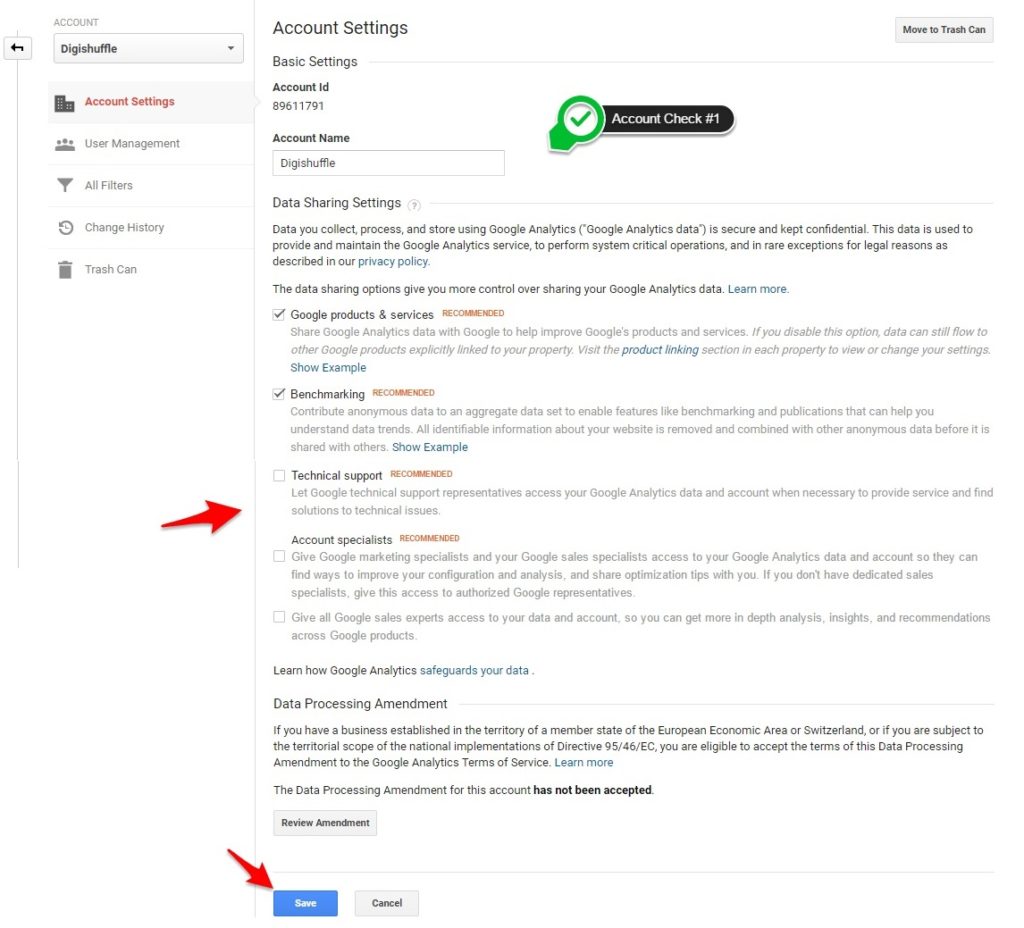
Google Products & Services – Google can access your data to understand trends & online behavior to improve adwords functionalities.
Benchmarking – You can unlock becnhmarking reports by sharing your data anonymously with google.
Report are available at Audience > Benchmarking Reports.
Technical Support – You can enable this, if you want technical analytics representatives to access your data. They can help you solve issues arising in your analytics account.
Account Specialist – You can enable both the checkbox, if you want sales & marketing specialist to access you data. They can help you with recommendations to improve your performance.
User Management - Check #2
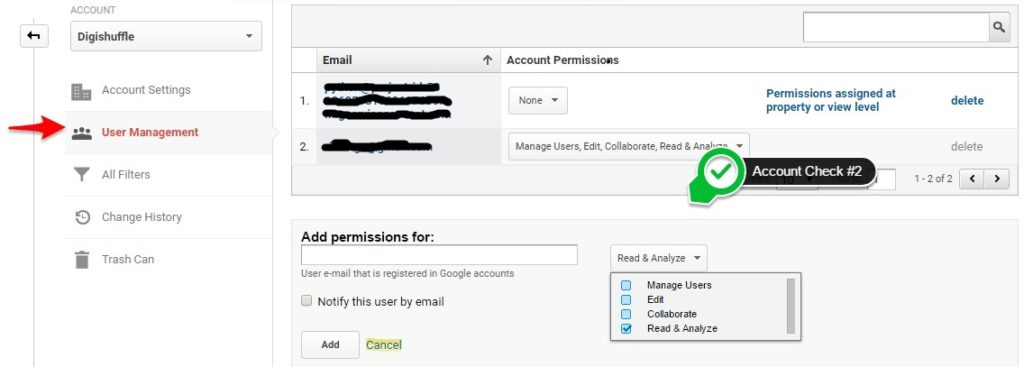
Manage Users – Users with this permission can add,delete & assign permissions to other users.
You can assign this to a person who manages the users having access to analytics account.
Read & Analyze – Users with this permission can only view the data & use functionalities within report. Eg: Use segments,secondary dimension,etc
You can assign this to Google Analytics Freelancers or Consultants, Agencies,etc (only to view data)
Collaborate – Users with this permission have Read & Analyze access & can collaborate on shared assets.
Eg: Edit Dashboard or Annotations, etc
You can assign this to Google Analytics Freelancers or Consultants. (who can collaborate on shared assests)
Edit – Users with Edit access have Read & Analyze & Collaborate access & also can add/edit/delete filters,goals,accounts,views, properties,etc
You can assign this to Google Analytics Freelancers or Consultants. (who can help creating goals, filter,etc )
Source : https://support.google.com/analytics/answer/2884495?hl=en
Google Analytics - Property Setup
1.) Property Settings
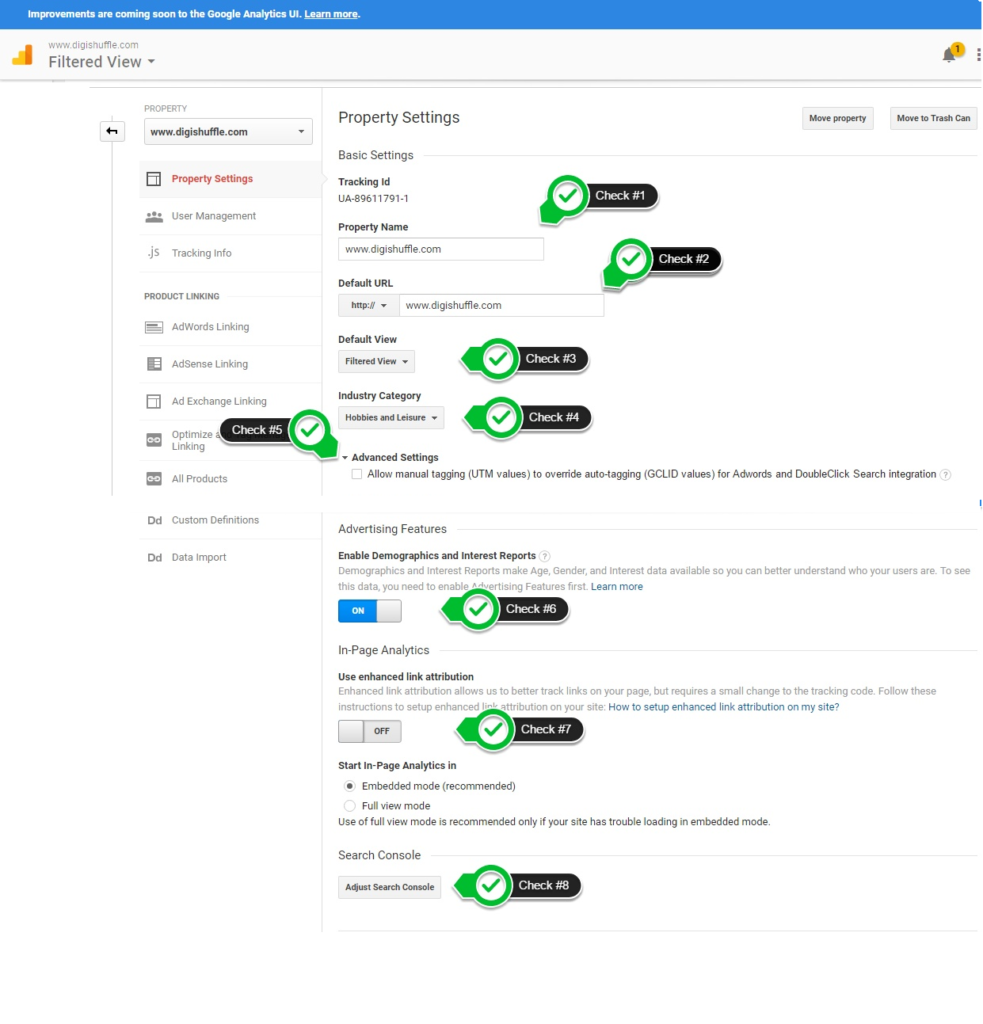
Property Name – Check #1
- You can use your website name
- It will not affect your data collection
Why To Use?
- It will display in the Property Selection Drop Down
Default URL – Check #2
- Enter your website URL
- It will not affect your data collection
Why To Use?
- The properties using same Default URL will be displayed in Page Analytics Drop Down
Default View – Check #3
- Select your Default View as Filtered View
- It will not affect your data collection
Why To Use?
- When you select your property the filtered view will be selected by default
Industry Category – Check #4
- Select Your Business Industry
- If not listed, select Others.
- It will not affect your data collection
Why To Use?
- Data used by GA for Benchmarking (not stated though)
Advanced Settings – Check #5
- Don’t Check, if you want to use Adwords auto-tagging.
Why To Use?
- If you have 3rdparty tracking or want to use custom values in URLs.
Enable Demographics & Interests Reports – Check #6
- Check this feature to unlock demographics & interests reports.
- You will need to enable advertising features too.
Why To Use?
- You get new reports in Audience > Demographics / Interests
It can also be used to refine targeting & create remarketing list.
Enhanced Link Attribution – Check #7
- In Page Analytics Reports are deprecated.
- Its replaced by Page Analytics Chrome Extension.
Why To Use?
- To differentiate different links on a page pointing to same pages.
Improves accuracy of data.
Search Console Linking – Check #8
- Integrate you Search Console with Google Analytics
- You’ll first need to verify your website in webmasters.
Why To Use?
- You’ll get webmaster reports in google analytics.
Reports are available in Acquisition > Search Console
2.) Tracking Info > Data Collection
Remarketing – Check #9
- Enable this to use remarketing functionality in analytics.
Why To Use?
- You can use remarketing lists to target in adwords using conditions from analytics.
Advertising Reporting Features – Check #10
- You can enable this feature along with ‘Demographics & Interest Reports’ in Check #6 to unlock demographics & interests reports.
- Check here for more info.
Why To Use?
- You can view these reports in Audience > Demographics / Interests
You can even use these as conditions to create remarketing lists.
3.) Tracking Info > User ID
User ID – Check #11
- If you have Login feature for the site, you can use User ID feature.
- You need to implement the User ID Tracking & create User ID View
- Check here for more info.
Why To Use?
- You can analyze data at user level.
You can get Cross Device Reports in User Id view.
4.) Tracking Info > Referral Exclusion List
Referral Exclusion List – Check #12
- Add sites such as payment gateways, cross domain tracking sites, etc.
- If you are not using any payment gateway or cross domain tracking, leave it with only your domain name.
- Check here for more info.
Why To Use?
- To avoid creating new session when user lands from these referral sites.
You will get the previous source data, when user is referred from these sites.
- Mostly used in Ecommerce Sites for payment gateways exlcusions & Cross domain tracking.
5.) Adwords Linking
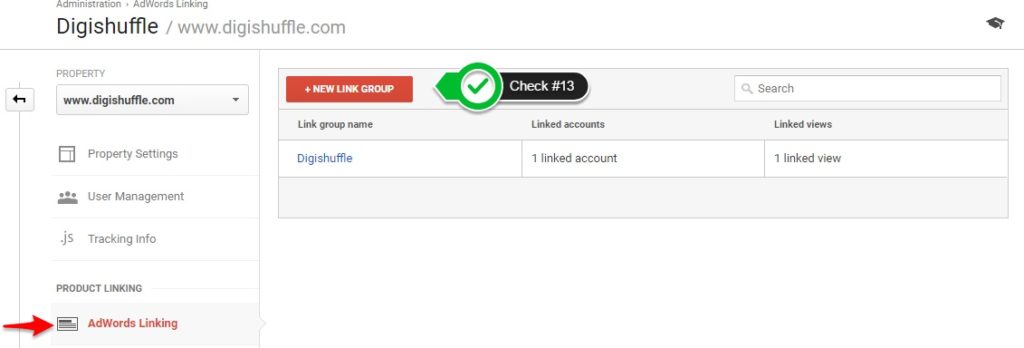

Adwords Linking – Check #13
- Check if the adwords account linked is correct.
- In Adwords UI, check the adwords settings > linked accounts > Google Analytics. (check the views linked)
- Check here for more info.
Why To Use?
- You can view Adwords data in Acquisition > Adwords Reports.
You can import analytics goals & metrics in adwords. (Bounce Rate, Pages / Session, etc)
6.) Optimize & Tag Manager Linking
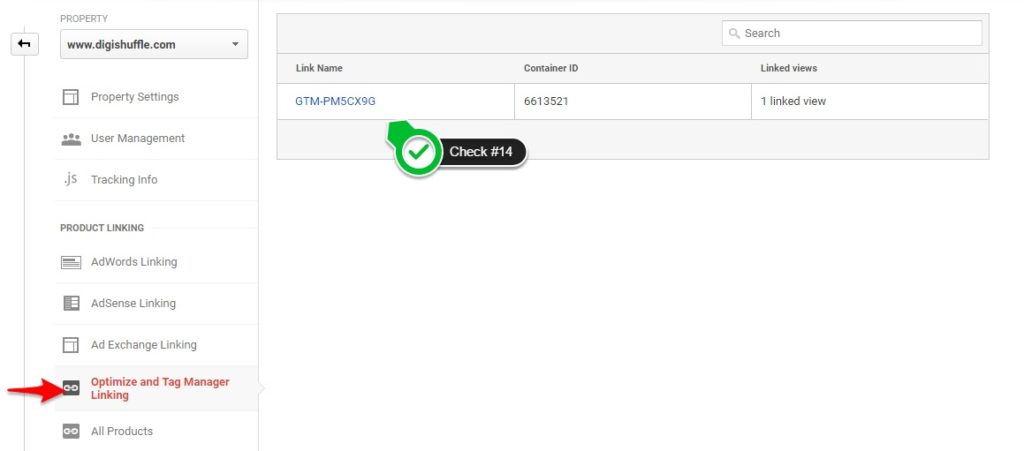
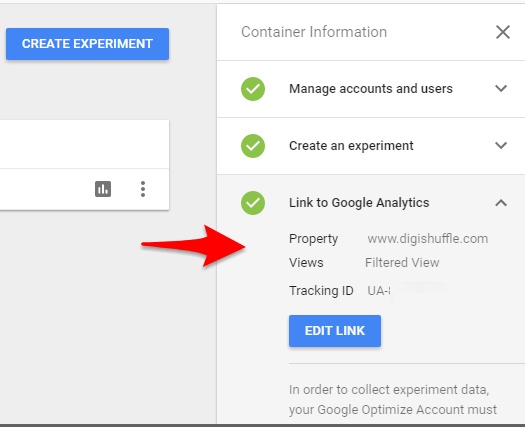
Optimize & Tag Manager Linking – Check #13
- Google Optimize is a free tool by google offering A/B Testing functionalities.
- Verify the integration in both analytics & optimize.
- Check here for more info.
Why To Use?
- Its a Free A/B Testing Tool which Integrates with Google Analytics.
You can create & run A/B tests & get the data in GA. This data can furthur be used for remarketing.
- You get the reports in Behavior > Experiments.
7.) Audience Definition > Audiences
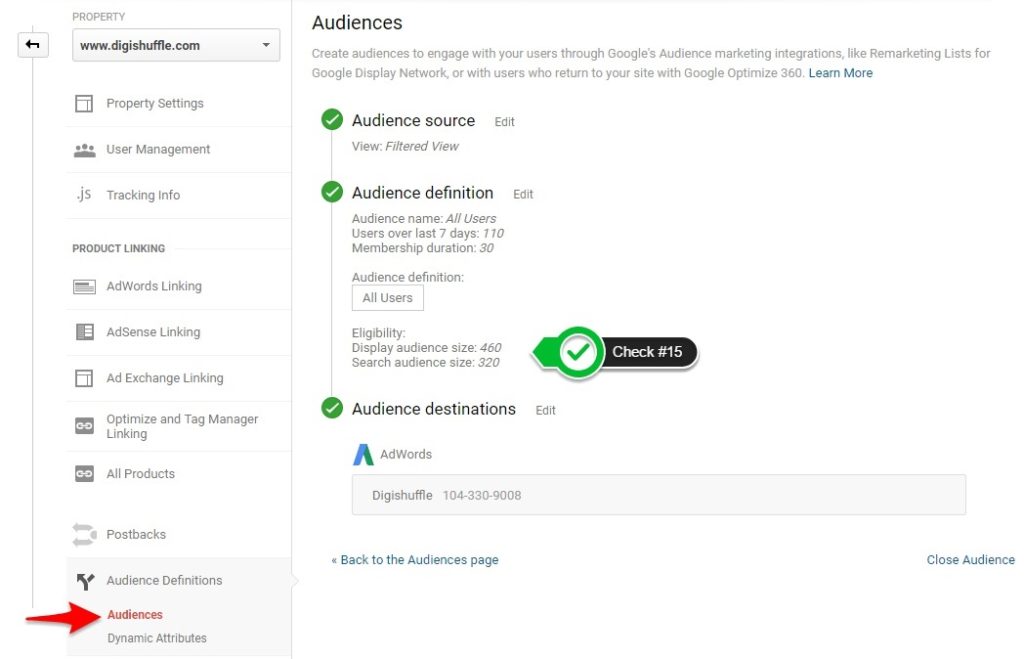
Remarketing List – Check #15
- Check if the list is getting populated for both Search & Display Audiences
- Adwords Linking is essential to enable this step.
- Check here for more info.
Why To Use?
- You can use these list in Adwords for Remarketing.
You can create advanced segments in analytics which can also be used to build audiences.
8.) Custom Definition > Custom Dimensions & Metrics
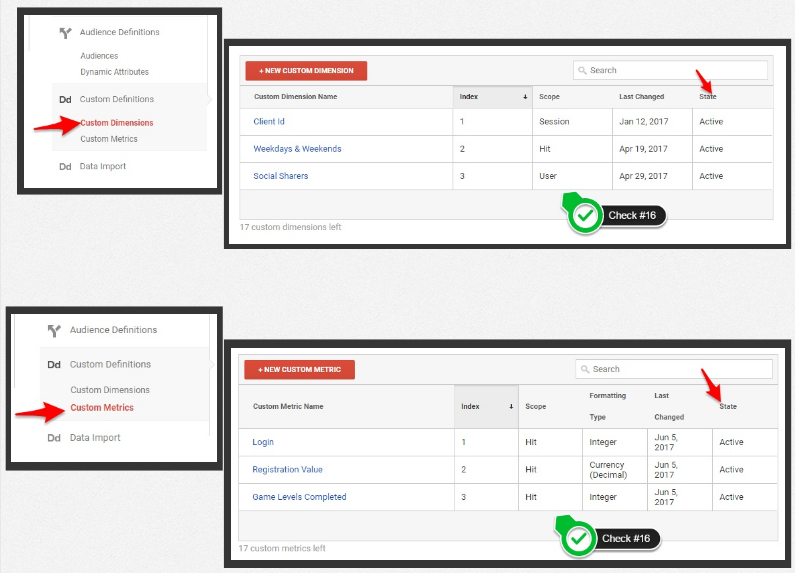
Custom Dimensions & Metrics – Check #16
- Check the Scope, State, etc. for the Custom Dimensions & Metrics.
- Be Careful, as changing the Scope will affect data.
- Check here for more info.
Why To Use?
- You can combine Non-Analytics Data with Analytics Data.
You can also remarket the audiences using these custom dimensions & metrics.
9.) Data Import
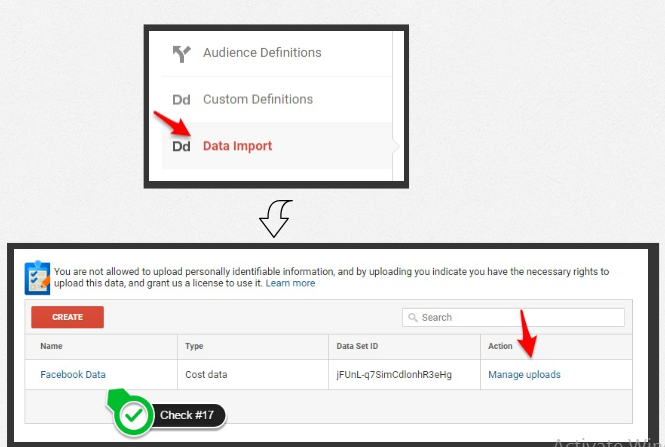
Data Import – Check #17
- Check the Type of Data uploaded & which metrics are getting populated.
- Check Manage uploads for the date/time of the data uploaded & the metrics it has populated.
- Check here for more info.
Why To Use?
- You can upload data from external sources & combine with analytics data.
You have different types of data uploads to choose from such as
User Data
– Campaign Data
– Content Data
– Product Data
– Custom Data, etc.
Google Analytics - View Setup
1.) View Settings
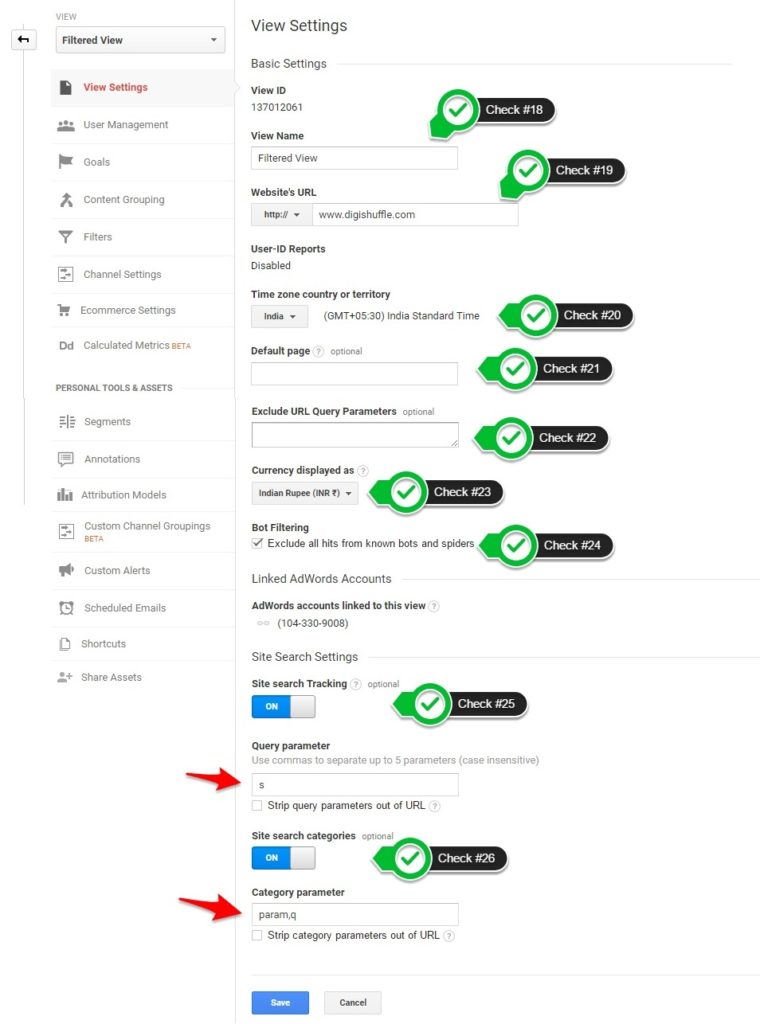
View Name – Check #18
- You can use names based upon view filters applied.
Eg: IP Filtered view, Raw view, Test view, Mobile view, etc - It will not affect your data collection.
Why To Use?
- It will display in the View Selection Drop Down.
You can also use it in APIs.
Website’s URL – Check #19
- Enter your website URL
- It will not affect your data collection.
Why To Use?
- This information will be used in content reports & In page Analytics.
Eg: Go To Behavior > Site Content > All pages Report. You’ll see small arrow bottom right of all pages.(which will use this hostname)
Time Zone – Check #20
- Select Your Reporting Time Zone.
- The analytics reports will be based on this time zone, not user’s time zone.
- Changing it will affect your data reporting going forward.
Why To Use?
- This information will be used by Analytics to configure the data as per selected Time Zone.
Default Page – Check #21
- If you have 2 similar pages with different URLs, Eg: www.abc.com & www.abc.com/index.html, Enter ‘index.html’ in the field.
- If you don’t want to report these as one page, then leave it blank.
- It will affect your pages reports.
Why To Use?
- If you enter your /index.html, then analytics will track ‘/’ & ‘/index.html’ as one page.
Exclude URL Query Parameter – Check #22
- You can enter the name of parameter in the URL which you want to exclude.
Eg: abc.com/?paramA=xyz. Enter ‘paramA‘ - Note: Parameters entered here are excluded before view filters
Why To Use?
- If you want to exlcude the URL parameters in analytics reporting.
Currency Displayed – Check #23
- Enter the currency you want to display in Reports.
Why To Use?
- This information will be used in cost & revenue reports
Bot Filtering – Check #24
- Check this to filter sessions from known bots & spiders
Why To Use?
- This will exclude fake sessions from known bots & spiders.
- If still some spam is affecting your account, you can use view filters.
Site Search Tracking – Check #25 & #26
- If you have a search results URL like: abc.com/?s=shoes. Enter ‘s’ in this fieldkj
- If you have search filters URL like: abc.com/?s=shoes&q=small¶m=black. Enter ‘param,q’ in Category parameter
- If you have other URL formats for search results pages, click here.
Why To Use?
- You will data for site search reports located in Behavior > Site Search.
2.) Goals

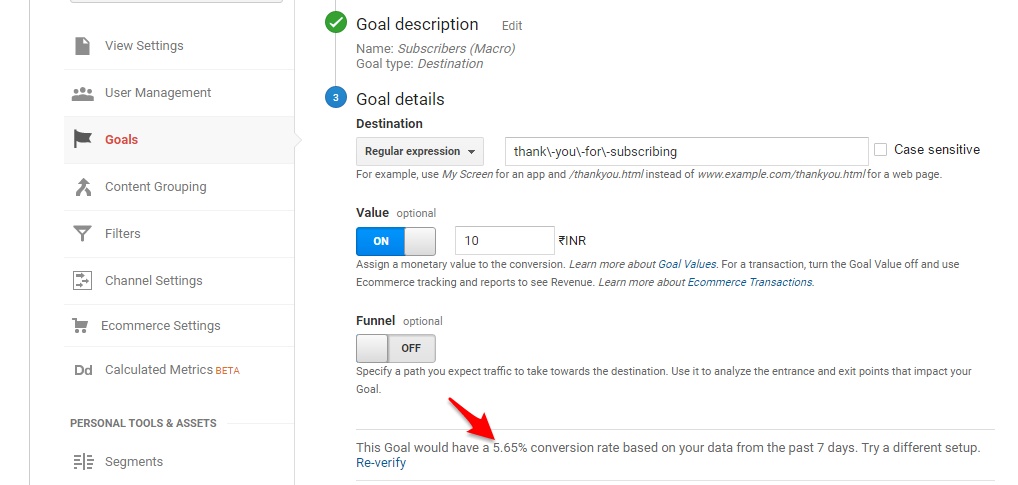
Goal Setup – Check #27
- Create a Macro & Micro Goal.
- Define the Goal Value.
- Check the goal definition & verify if its tracking correctly. (also check real time conversion report)
- Click here for the Goal setup.
Why To Use?
- You can use macro goals to track your main busienss objective.
Eg: Gross Profit, Transactions, etc - By defining micro goal, you also can track other important KPIs.
Eg: Newsletter downloads, Social shares,etc
3.) Content Grouping

Content Grouping Setup – Check #28
- You can group various pages using Content Grouping.
- Eg: Product pages, search result pages, product listings pages, etc.
- Click here for the Goal setup.
Why To Use?
- You can analyze various metrics for the page groups defined in content grouping.
- You can get reports in Behavior > Site Content reports (in content grouping drop down). Also you can use page group dimensions via APIs
4.) Channel Settings
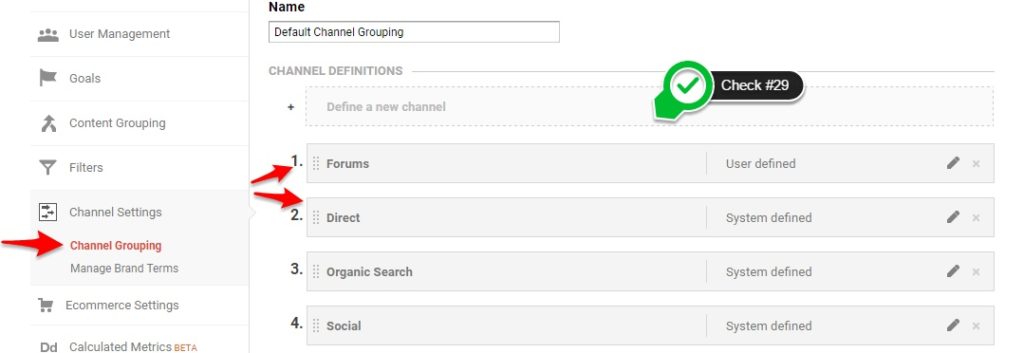
Channel Grouping – Check #29
- You can add / edit channels pre-defined by google.
- Ordering is important as the conditions are filtered from top to bottom.
- Click here for more.
Why To Use?
- You can analyze various metrics for the channel groups defined in channel grouping.
- You can also use these channels in multi channel funnel reports

Manage Brand Terms – Check #30
- You can add Brand & Brand variants keywords.
- The keywords will be matched using ‘contains’ filter.
- Click here for more.
Why To Use?
- It will create Brand & Generic paid channels in Default channel grouping.
5.) Filters

View Filters – Check #31
- You can add/edit new filter to exclude internal IPs, subdomains, etc.
- Ordering is important & filtering is from top to bottom.
- Click here for more.
Why To Use?
- You can filter data by a dimensions such as device, city, pages, custom dimensions, etc.
- You can also modify the data collected before sending it to reporting interface.
6.) Ecommerce Settings
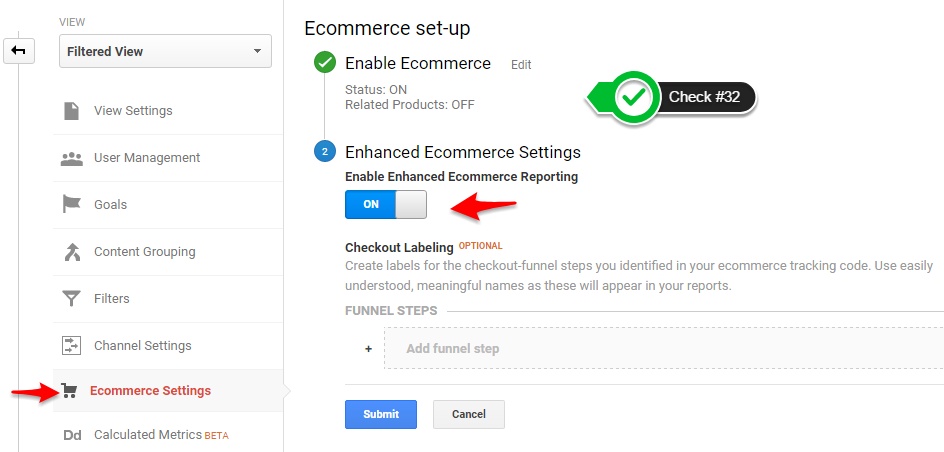
Ecommerce & Enhance Ecommerce Setup – Check #32
- To enable Ecommerce reports, you need to enable the Ecommerce & setup the Ecommerce code.
- For Enhanced Ecommerce reports, you need to enable the Enhanced Ecommerce & setup Enhanced Ecommerce code tracking.
- You cannot implement both at same time.
- Click here for more.
Why To Use?
- You will get transaction & revenue data in conversions > ecommerce reports.
- Enhanced Ecommerce is recommended for more actionable data.
- You can even remarket users based on the ecommerce dimensions & metrics.
Eg: Cart Abandoned users, Users with revenue > 1000$, etc
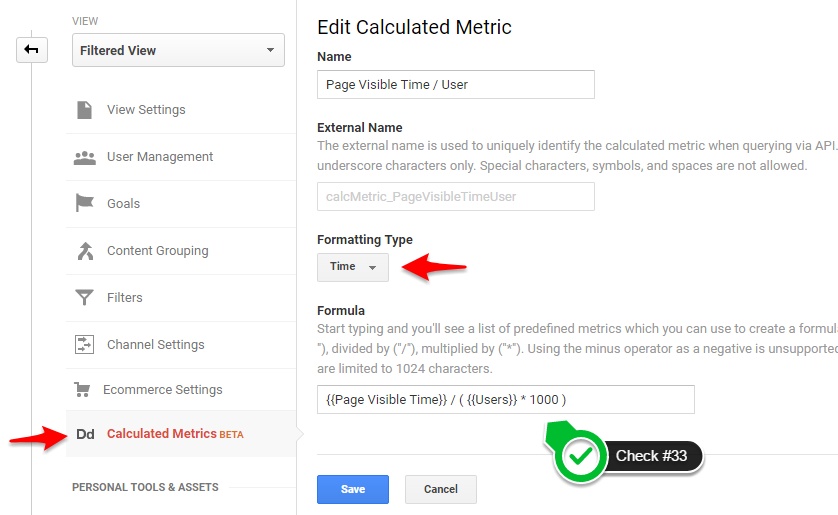
Calculated Metrics – Check #33
- You can create your own metric using math operation with other metrics.
- You can use the new metrics in custom reports, dashboard & APIs..
- Click here for more.
Why To Use?
- You can create a customized metric important for your business goals.
- You can define your own KPIs.
Google Analytics Technical Audits
1.) Proper Code Placement
- Google Analytics Code should be placed immediately after the opening head tag.
Check here. - Google Tag Manager code should be placed just after opening head tag & no-script code just after opening body tag.
Click here - You can tools like screaming frog to check if code is placed on all pages.
Why To Use?
- Analytics / Tag Manager library can load soon & you will get more accurate data. It is also a google’s best practice.
- Analytics / Tag Manager will fire even when placed in body or footer.
2.) Single Analytics Code
- Make sure to use single analytics code for a particular analytics property.
- Avoid firing analytics via tag manager & sole analytics code simultaneously.
Why To Use?
- To avoid getting flawed data like double pageviews, reduced bounce rates, etc
3.) Events / Goals Firing
- You can create a test view & check if the goals/events are getting tracked on all
- Devices
- Browsers
.
- You can use the browser debugger or Tag Assistant Plugin.
Why To Use?
- To see if tracking is working correctly across all devices, browsers, pages, etc.
Summary
- While configuring Google Analytics make sure you understand what each settings mean.
- It’s not necessary to implement all but only what is necessary for your business.
- You can even check the corresponding google support page link, if you have any doubts.
- You can download the Google Analytics Audit Checklist eBook.
More Articles
How To Track Multiple Ecommerce Funnels in Google Analytics (Analytics Hacks)
Automated Cost Data Import – Facebook To Google Analytics
16 Powerful Facebook Custom Events For Remarketing.
10 Incredible Ways to Analyze High Bounce Rate – Advanced Guide
Adwords CPA Scanner – Analyze & Reduce High CPAs in Seconds.
Awesome article!
Thanks Faisal 🙂
Hey isnt there a tool who can do the above for us? So we dont have to check everything from the beginning, when we audit a new GA account?
Hi Jake,
Yes. We are in a process of developing an audit tool. Will release soon. 🙂
Thanks,
Ritwik