Last Updated on May 6, 2019 by Ritwik B
Once you have installed the Facebook pixel on your website, it’s now time to check if everything is working correctly.
& the good thing is…
Facebook has released a free chrome extension to debug pixel tracking. I know you might already have installed it but if NOT, then here’s the link:-
Facebook Pixel Helper Guide
INDEX
What is Facebook Pixel Helper? & How Does It Help You?
Let’s understand a bit about Facebook Pixel Helper.
As per Facebook docs,
Facebook Pixel Helper is a troubleshooting tool that helps you find out if your pixel is working correctly.
Installing the addon can help you:
- Check if there’s a Facebook pixel installed on a website.
- Check for errors and output the information that’s coming from a pixel.
- Offer tips on improving your pixel’s performance, including suggestions to:
- Log actions that take place on your website.
- Opt-in to tracking.
- Place one conversion event per page.
Once you download the Chrome extension, you’ll see the icon  on the top-right corner. You can open your website & click on it.
Understanding The Main Components of Facebook Pixel Helper
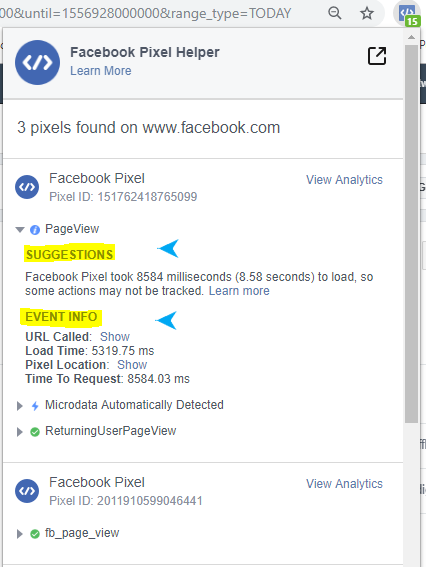
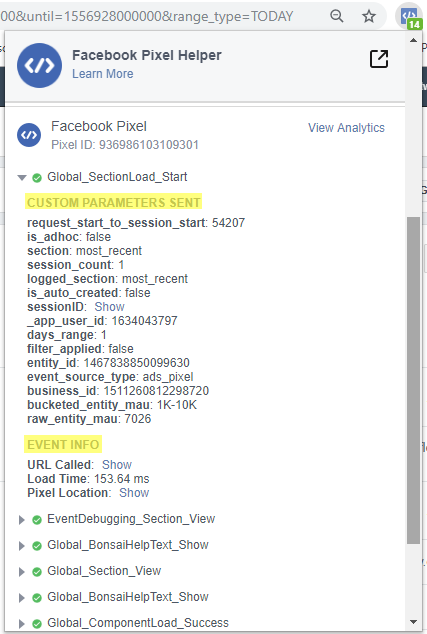
It is essential to understand the main components of Facebook Pixel Helper. Let’s take a look at what all things it displays on its interface while debugging the pixel on your website.
1.) The Pixel ID & Its Events:
For Agencies: If you have won a new client, it’s important to check if the website contains the relevant pixel ID.
It might happen that you got access to the wrong Facebook account & its pixel id doesn’t match with the one installed on the website.
For Other Businesses: If you have multiple agencies handling your Facebook campaigns, make sure only those Pixel Ids are present on your website.
2.) Suggestions / Warnings (Errors)
As specified earlier, the pixel helper will also monitor your site for any pixel related errors & offer tips to improve the performance.
Some of the examples are:
- Increase in pixel load time.
- Facebook Pixel Activated X Times
- Invalid Pixel Id
- Pixel Did Not Load.
- & so on…
These suggestions/errors can help you spot & resolve the error in no time. You can even click on learn more icon which directs you to the specified error page.
3.) Custom Parameters Sent
Remember the facebook tracking pixel code structure?? When you fire an event, you need to define the event name & the custom parameters.
Though the custom parameters are an optional part, it’s good to have it to further segment your data while creating remarketing audiences.
fbq('track', 'Purchase', {currency: 'EUR', value: 15.23});
The part in red represents custom parameters.
You can check if the custom parameters sent are free from any spelling/value errors.
4.) Event Info
It will display the information of the event such as
- URL Called – It is the URL ‘https://www.facebook.com/tr/’ where the GET request is sent along with the custom parameters.
- Load Time – It is the pixel load time.
- Pixel Location – It is the URL of the page where the event occurred.
- Pixel Code – It denotes the actual JS event code on your website.
Debugging Facebook Pixel Warnings, Errors & Suggestions.
Let’s have a look at some of the errors/suggestions as displayed by pixel helper & ways to resolve it.
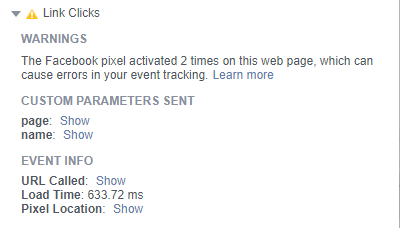
#1 Pixel Activated Multiple Times
You might have encountered this error many times. It means that a pixel with the same ID and event name was sent multiple times to Facebook.
As per facebook docs,
The same event should only occur once upon page loading. If it is sent with different custom data parameters, those parameters should be aggregated into a single pixel event.
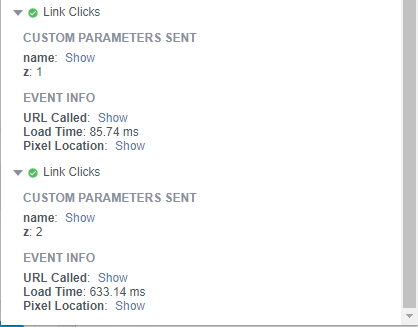
Solution: Simply attach an extra parameter (say ‘z’) with a random value (or maybe a counter).
Say, if you have implemented outbound click tracking & the user clicks on the same outbound link multiple times. Facebook pixel helper will display an error.
Just attach an extra custom parameter with random value or a counter. (similar concept as cache buster) (check image below)
#2 Pixel Did Not Load
This error means that the Pixel Helper found what looks to be Facebook pixel code on your site, but the actual HTTP call was never made.
Some of the major reasons might be:
- Usage of Ad Tracking Blocker in your browser (like Ghostery)
- Error in JS event listener code which might be listening for events like click, hover, load, etc.
- Other error in implementing the code. (due to other libraries)
#3 Invalid Pixel ID
It means that the sent ID for the pixel did not match a known pixel ID in Facebook’s system. You can go to your events manager & check for the correct pixel ID.
#4 Encoded Characters
It means that the Pixel Helper found what looks to be double-encoded characters. (“””)
The solution would be to confirm that characters are not being encoded twice. ( try changing & to &.)
#5 Not a Standard Event
It means that there is a misspelling in your standard events name. Do check for the correct standard event names here.
For example, the event is named Purchased instead of Purchase.
#6 Can not find Product Catalog
It means that the Product Catalog ID which was passed as a field product_catalog_id as a custom parameter in the pixel could not be found on Facebook’s system.
You can do 2 things here –
#1 – You’ll need to re-verify the Product IDs which you uploaded in the catalog match with the ones passed via code.
Or
#2 – Associate a Product Catalog to a pixel.
#7 You Have Opted Out of Tracking
You’ll see this error if you have opted out of tracking from Facebook. This will not log any events on Facebook’s servers.
You can turn on the tracking by visiting facebook ‘s ad preferences.
#8 Pixel is not paired with a product catalog
It means that the pixel is not paired with any product catalog. You can go to the Business Manager > Product catalog & associate a pixel ID.
#9 Pixel Took Too Long to Load
It means that pixel loading time is more. This may be due to where the pixel is located on the page or slow network connection.
NOTE: It is recommended to place the pixel code just before the closing </head> tag in the HTML.
#10 Pixel Advanced Matching
It means that the value sent for the advanced matching parameter is invalid or not formatted correctly.
You’ll need to re-verify the values are formatted correctly in the JS code before sending it to the Facebook’s servers.
BONUS TIPS - How To Speed Up The Facebook Pixel Implementation Process
Facebook event code debugging might be time-consuming. But you can use some of the techniques to speed up the process.
BONUS TIP #1: Split The Windows Side By Side While Debugging The Pixel Code
You can click on the Facebook pixel helper & open it on a new window. Then you can use window + left arrow to split the windows side by side.

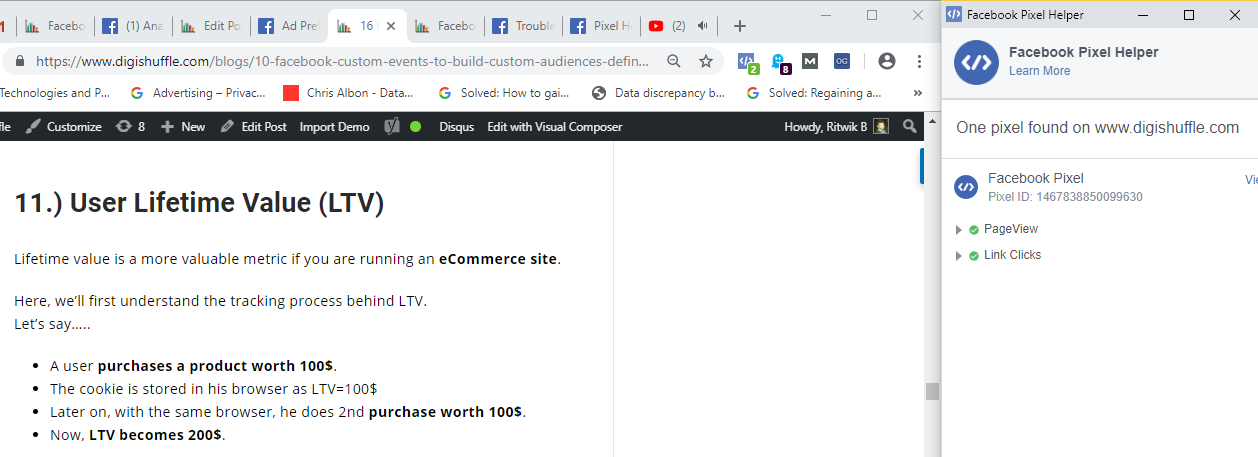
By using this method, you can test live actions on the page & see if they are getting reflected in the pixel helper.
BONUS TIP #2: Use Browser Console To Test Pixel Event Code Before Actual Implementation.
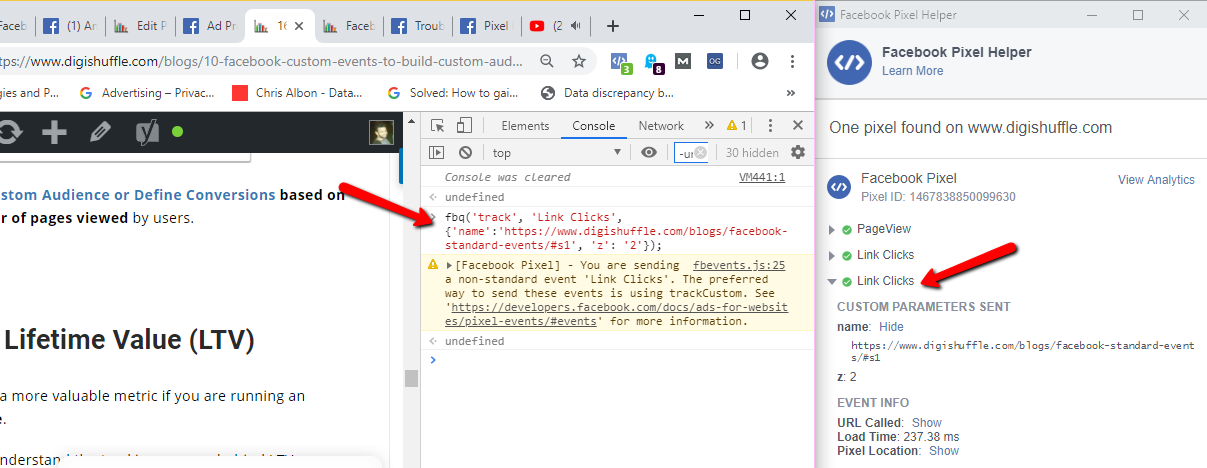
This is by far the best method to test your code before you move it to production. (or publish it via GTM)
You can follow the below steps:
- Open a page on a website
- Open your browser console. (Ctrl/CMD +shift+I)
- Paste the Facebook pixel JS event code.
- Check the Facebook Pixel Helper to see if everything’s ok.
To get started, you can try any of these 16+ facebook standard events to check if the data is getting sent to Facebook’s servers.
Lastly...
You can even check the facebook analytics > event debugging report to debug live events received by Facebook’s servers.
The good part is you can even see the breakdown of events by different devices & OS.
Also, when you’re not using the pixel helper addon, you can simply hide it or remove it from your browser.
