Last Updated on February 25, 2018 by Ritwik B
The last article has received great feedback & we would be dealing with more advanced facebook custom events in this article too.
Facebook still doesn’t have much segmentation functionality (as compared to Google) for remarketing users.
I recommend you to go through the list of 10 custom events for Facebook in the previous article if you haven’t.
Now without wasting any further time, let go through these new events.
1.) User Lifetime Value (LTV)
Lifetime value is a more valuable metric if you are running an eCommerce site.
Here, we’ll first understand the tracking process behind LTV.
Let’s say…..
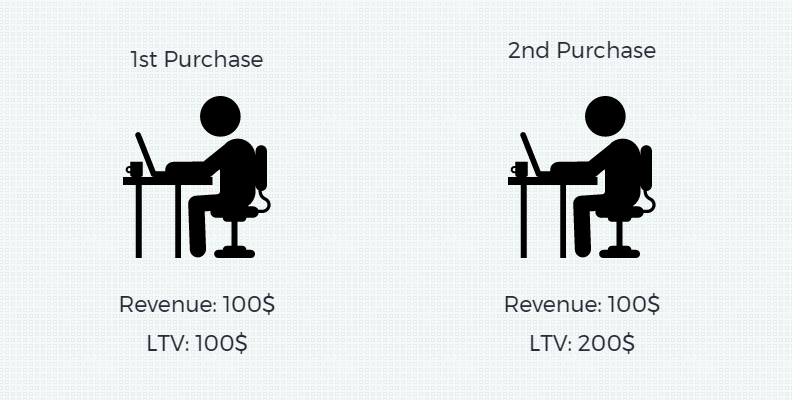
- A user purchases a product worth 100$.
- The cookie is stored in his browser as LTV=100$
- Later on, with the same browser, he does 2nd purchase worth 100$.
- Now, LTV becomes 200$.
Below image will summarize the things.
Step – 1 : Create Custom HTML in GTM
Create Custom HTML & paster the following code
<script>

var revenue = {{Revenue}}     // Revenue
var cookie_name = 'c_ltv'     //Name of Cookie
var cookie_duration = 365*2   //days

if(readCookie(cookie_name) == null)
{
fbq('trackCustom','LTV',{'value': parseFloat(revenue) ,'page':{{Page URL}}})
createCookie(cookie_name, revenue ,cookie_duration)
} else
{
var old_revenue = readCookie(cookie_name)
revenue = parseFloat(old_revenue) + parseFloat(revenue)
fbq('trackCustom','LTV',{'value': parseFloat(revenue) ,'page':{{Page URL}}})
eraseCookie(cookie_name)
createCookie(cookie_name, revenue , cookie_duration )
}


// Source : https://www.quirksmode.org/js/cookies.html ///
function createCookie(name,value,days) {
	if (days) {
		var date = new Date();
		date.setTime(date.getTime()+(days*24*60*60*1000));
		var expires = "; expires="+date.toGMTString();
	}
	else var expires = "";
	document.cookie = name+"="+value+expires+"; path=/";
}

function readCookie(name) {
	var nameEQ = name + "=";
	var ca = document.cookie.split(';');
	for(var i=0;i < ca.length;i++) {
		var c = ca[i];
		while (c.charAt(0)==' ') c = c.substring(1,c.length);
		if (c.indexOf(nameEQ) == 0) return c.substring(nameEQ.length,c.length);
	}
	return null;
}

function eraseCookie(name) {
	createCookie(name,"",-1);
}
</script>
- Here, you have to populate the {{Revenue}} variable in GTM.
- Cookie name is ‘c_ltv’, you can change if you want to.
- Cookie duration is 2 years. So if the user makes the consecutive purchase within 2 yrs, the cookie will never expire.
Step – 2: Implement Tag Sequencing.
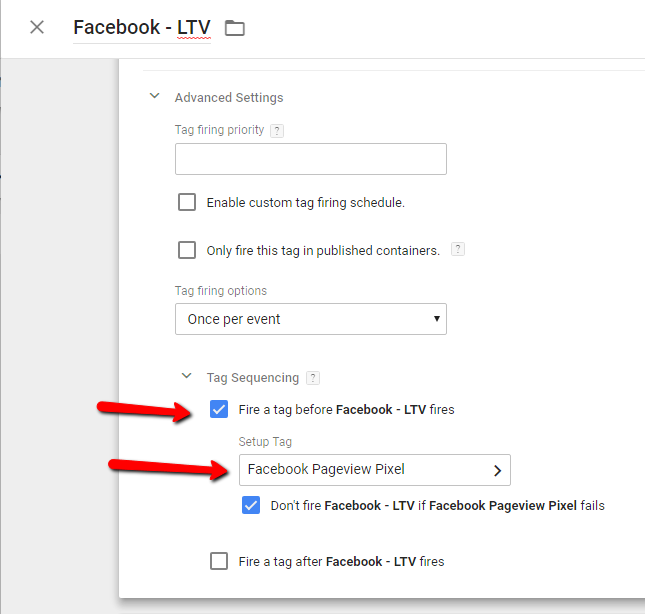
‘fbq’ variable should be initialized before firing any facebook event. Make sure to fire facebook pixel tag before firing any event tag. Here is the configuration below.
Step – 3: Create a Revenue Variable
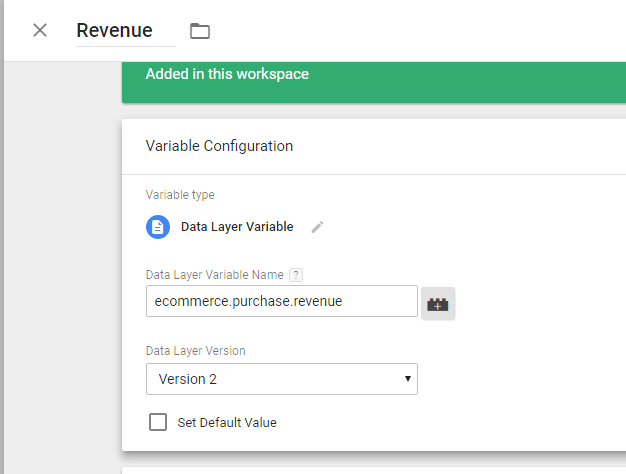
I’ll leave it open for you to create {{Revenue}} variable. You can use DataLayer, Custom Javascript, DOM element, etc.
Here’s an image if you have implemented enhanced e-commerce via dataLayer
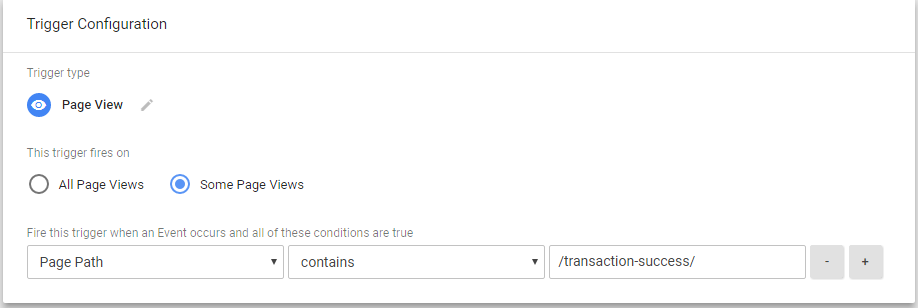
Step – 4: Create Trigger on Purchase
Fire the above custom HTML tag on success page or e-commerce transaction success event.
Step – 5: Verify the Tag Event
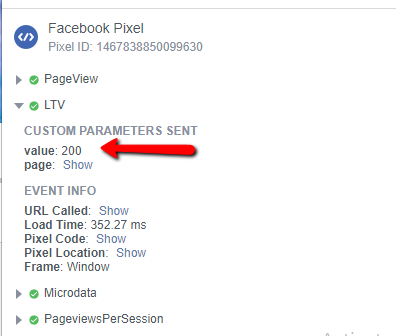
Lastly, use the facebook debugger plugin to check the event. Try test purchases & check, if the revenue gets added on.
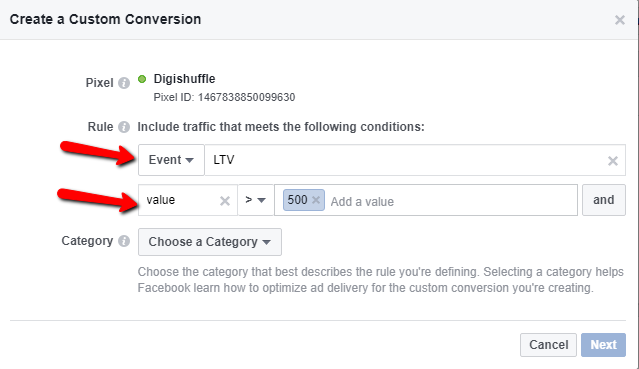
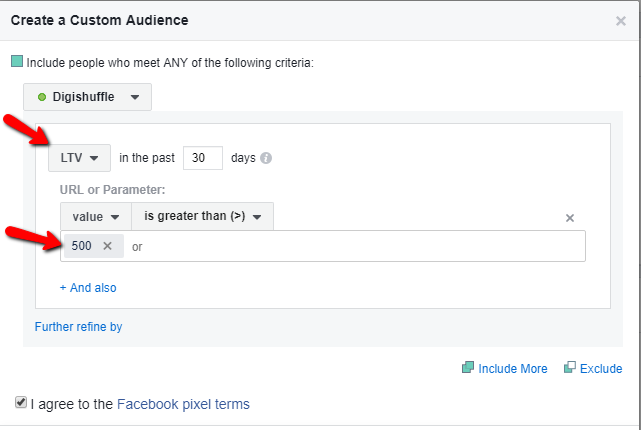
Step – 6: Create Custom Conversions or Custom Audiences
Facebook needs to collect data of the events defined before it can display it in the interface. You can check later on & define the custom conversions or custom audience as per your needs.
2.) Pageviews / User
In the last article, we saw pages/sessions event, which is a session level metric rather than user level.
Here, you can record the total pages viewed by the user in his/her lifetime.
Step – 1: Create Custom HTML in GTM
Paste the following code in Custom HTML – GTM
<script>

var cookie_name = 'pv_per_user'     //Name of Cookie
var cookie_duration = 365*2   //days

if(readCookie(cookie_name) == null)
{
fbq('trackCustom','PageviewsPerUser',{'Pages Viewed': 1 ,'page':{{Page URL}}})
createCookie(cookie_name, '1' ,cookie_duration)
} else
{
var old_pageviews = readCookie(cookie_name)
old_pageviews = parseInt(old_pageviews) + 1
fbq('trackCustom','PageviewsPerUser',{'Pages Viewed': old_pageviews ,'page':{{Page URL}}})
eraseCookie(cookie_name)
createCookie(cookie_name, old_pageviews , cookie_duration )
}


// Source : https://www.quirksmode.org/js/cookies.html ///
function createCookie(name,value,days) {
	if (days) {
		var date = new Date();
		date.setTime(date.getTime()+(days*24*60*60*1000));
		var expires = "; expires="+date.toGMTString();
	}
	else var expires = "";
	document.cookie = name+"="+value+expires+"; path=/";
}

function readCookie(name) {
	var nameEQ = name + "=";
	var ca = document.cookie.split(';');
	for(var i=0;i < ca.length;i++) {
		var c = ca[i];
		while (c.charAt(0)==' ') c = c.substring(1,c.length);
		if (c.indexOf(nameEQ) == 0) return c.substring(nameEQ.length,c.length);
	}
	return null;
}

function eraseCookie(name) {
	createCookie(name,"",-1);
}
</script>
- Here, Cookie Duration is kept as 2 yrs. So, the cookie will never expire, if the user does a consecutive pageview within 2 yrs.
Step – 2: Implement Tag Sequencing.
Step – 3: Trigger the Above tag on All Pages.
Step – 4: Verify the Tag
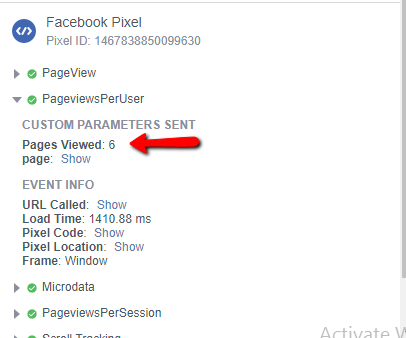
You can check your facebook pixel debug plugin for the events.
3.) Element Visibility
This would be based on recent GTM update. Now you can track a DOM element visibility.
So, if you have a specific banner, form, GIF, Offer Text, etc you can track if the user viewed the element & for how long it was visible to the user.
Step – 1: Enable GTM Visibility Variables
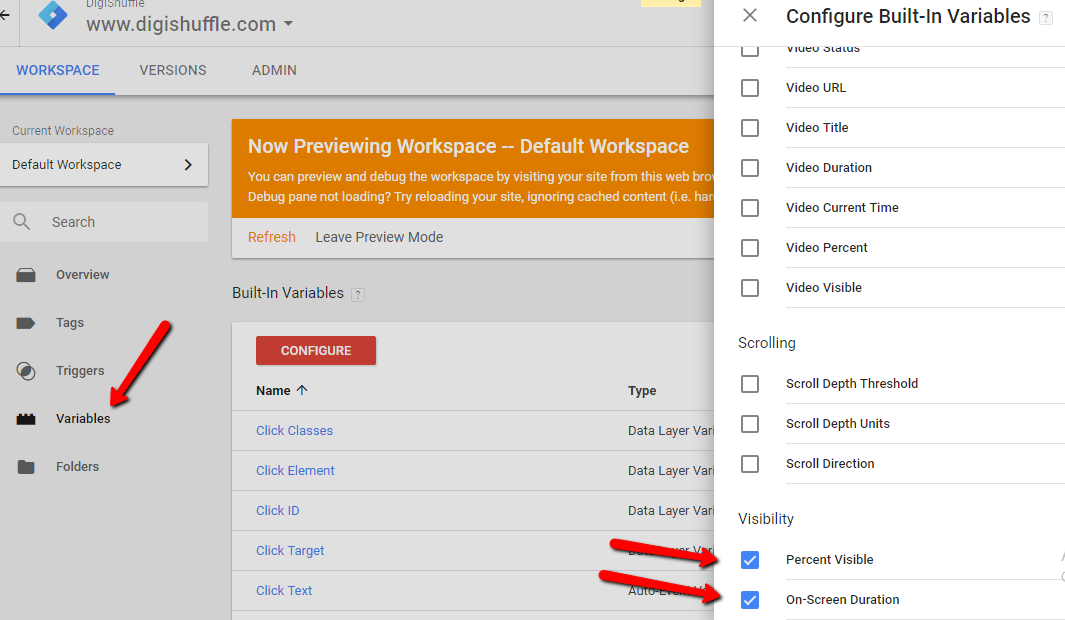
Go To Variable > Built-In Variables > Enable Percent Visible & On-Screen Duration Variable.
Step – 2: Create Element Visibility Trigger
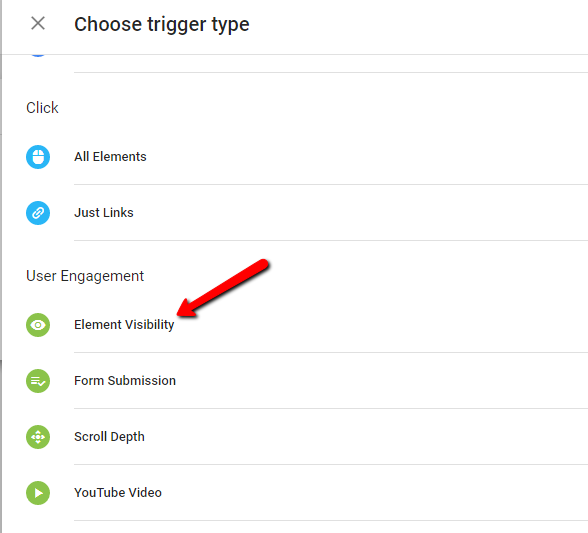
Go To Triggers > Create Element Visibilty Trigger
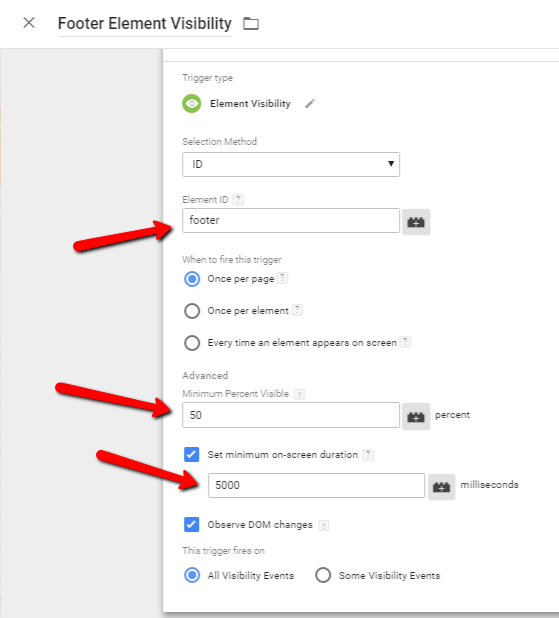
Fill In the Element ID you want to track. Check the below configuration.
- You can even choose the minimum percent visibility of element, when the event would be triggered.
- You can set the duration of visibility.
- For more info about this trigger, you can check here.
Step – 3: Create Custom HTML Tag.
Now create custom HTML tag & paste:
<script>fbq('trackCustom','FooterElementVisible',{'Duration':{{On-Screen Duration}},
'Visibility':{{Percent Visible}},'page':{{Page URL}}})</script>
Step – 4: Implement Tag Sequencing
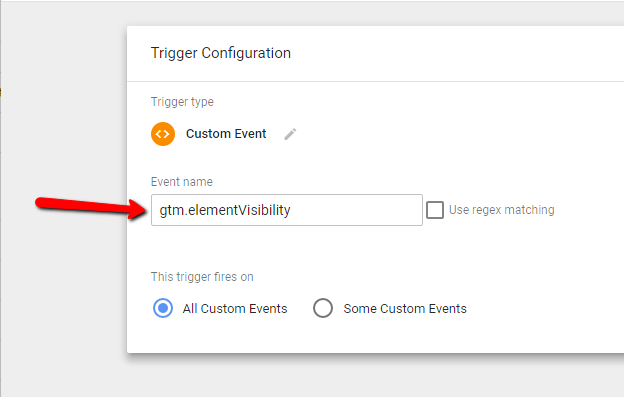
Step – 5: Fire Tag on Visibility Event
Fire the Tag with an event trigger with the name ‘gtm.elementVisibility’
Step – 6: Verify the tag
4.) Source, Medium & Campaign – UTMs – First Attribution
In Google analytics, you can create the remarketing lists knowing the user’s previous source, medium, campaign. Let’s try to replicate the same functionality in facebook. We’ll look at
- First Attribution – Initial Source will take precedence.
- Last Attribution – Last source will take precedence
Let’s start with the first attribution & understand the coding process:
- When the user lands on your website with utm tags, facebook event will fire with UTM parameters source, medium & campaign.
- When the user lands directly, the Facebook event will fire source as ‘direct’ & medium as ‘none’.
- When the user lands from other sites, referrer would be used as source & medium as ‘organic‘.
- UTMs will only be stored for 1st user visit & will not be overridden. (First Attribution)
Step – 1: Create Custom HTML Tag
Paste the below code to track UTMs
<script>
/* UTM Tracking - First Attribution
 * @Ritwikga
 * Digishuffle
 */

var cookie_name = 'fb_utm'     //Name of Cookie
var cookie_duration = 180   //days

if(/utm_source/g.exec(location.search) && /utm_medium/g.exec(location.search))
{
cookieModify(cookie_name, true)
} else {cookieModify(cookie_name, false)}

function cookieModify(cookie_name, utms)
{
if(readCookie(cookie_name) == null)
{
if(utms)
{
var source = /utm_source=([^&]+)/g.exec(location.search)[1]
var medium = /utm_medium=([^&]+)/g.exec(location.search)[1]
var campaign = /utm_campaign=([^&]+)/g.exec(location.search)?/utm_campaign=([^&]+)/g.exec(location.search)[1]:'undefined'

fbq('trackCustom','UTMs',{'Source': source ,'Medium': medium, 'Campaign': campaign })
var cookie_value = 'utm_source='+source+'&utm_medium='+medium+'&utm_campaign='+campaign;
createCookie(cookie_name, cookie_value ,cookie_duration)
} else
{
var source = (document.referrer =="")?"direct" : document.referrer
var medium = (source == "direct") ? "none" : "organic"
var campaign = 'none'

fbq('trackCustom','UTMs',{'Source': source ,'Medium': medium, 'Campaign': campaign })
var cookie_value = 'utm_source='+source+'&utm_medium='+medium+'&utm_campaign='+campaign;
createCookie(cookie_name, cookie_value ,cookie_duration)
}

}
else
{
var old_utms = readCookie(cookie_name)
var source = /utm_source=([^&]+)/g.exec(old_utms)[1]
var medium = /utm_medium=([^&]+)/g.exec(old_utms)[1]
var campaign = /utm_campaign=([^&]+)/g.exec(old_utms)?/utm_campaign=([^&]+)/g.exec(old_utms)[1]:'undefined'
fbq('trackCustom','UTMs',{'Source': source ,'Medium': medium, 'Campaign': campaign })
}

}


// Source : https://www.quirksmode.org/js/cookies.html ///
function createCookie(name,value,days) {
	if (days) {
		var date = new Date();
		date.setTime(date.getTime()+(days*24*60*60*1000));
		var expires = "; expires="+date.toGMTString();
	}
	else var expires = "";
	document.cookie = name+"="+value+expires+"; path=/";
}

function readCookie(name) {
	var nameEQ = name + "=";
	var ca = document.cookie.split(';');
	for(var i=0;i < ca.length;i++) {
		var c = ca[i];
		while (c.charAt(0)==' ') c = c.substring(1,c.length);
		if (c.indexOf(nameEQ) == 0) return c.substring(nameEQ.length,c.length);
	}
	return null;
}

function eraseCookie(name) {
	createCookie(name,"",-1);
}
</script>
- Name of the Cookie is ‘fb_utm’
- Cookie Age is 6 months.
- Feel Free to change as per your needs.
Step – 2: Implement Tag Sequencing
Step – 3: Trigger on All Pages
Step – 4: Verify using Facebook Plugin
- You can try putting utms in the url & check the ‘UTM’ Event parameters.
5.) Source, Medium & Campaign – UTMs – Last Attribution
In this model, UTMs will get overridden. So..
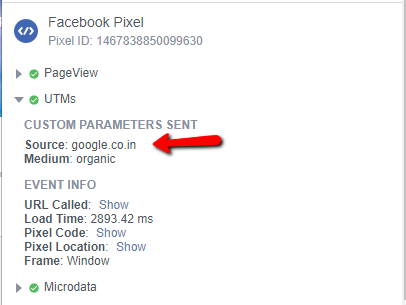
- When user lands on your site from Google via organic, event parameters will be
- Source: google.com
- Medium: organic
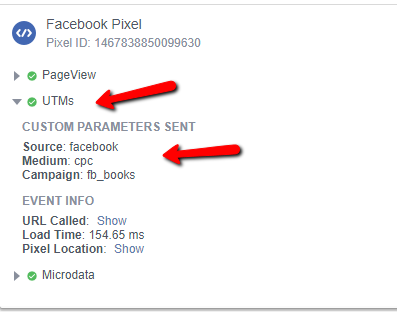
- Later, when the user lands on your site with utms, they would be used as event parameters. For Eg: www.digishuffle.com?utm_source=facebook&utm_medium=cpc&utm_campaign=fb_book
- Source: facebook
- Medium: cpc
- Campaign: fb_book
Step – 1: Create Custom HTML
Paste the following code:
<script>
/* UTM Tracking - Last Attribution
 * @Ritwikga
 * Digishuffle
 */

var cookie_name = 'fb_utm'     //Name of Cookie
var cookie_duration = 180   //days

if(/utm_source/g.exec(location.search) && /utm_medium/g.exec(location.search))
{
cookieModify(cookie_name, true)
} else {cookieModify(cookie_name, false)}

function cookieModify(cookie_name, utms)
{
if(utms)
{
var source = /utm_source=([^&]+)/g.exec(location.search)[1]
var medium = /utm_medium=([^&]+)/g.exec(location.search)[1]
var campaign = /utm_campaign=([^&]+)/g.exec(location.search)?/utm_campaign=([^&]+)/g.exec(location.search)[1]:undefined

fbq('trackCustom','UTMs',{'Source': source ,'Medium': medium, 'Campaign': campaign })
if(readCookie(cookie_name) != null)
{eraseCookie(cookie_name)}

var cookie_value = 'utm_source='+source+'&utm_medium='+medium+'&utm_campaign='+campaign;
createCookie(cookie_name, cookie_value ,cookie_duration)
} else
{
if(document.referrer.search(location.hostname) == -1 )
{
var source = (document.referrer =="")?"direct" : document.referrer.replace(/(http|https):\/\/www\.|\//g,"")
var medium = (source == "direct") ? "none" : "organic"
var campaign = undefined

fbq('trackCustom','UTMs',{'Source': source ,'Medium': medium, 'Campaign': campaign })

if(readCookie(cookie_name) != null)
{eraseCookie(cookie_name)}

var cookie_value = 'utm_source='+source+'&utm_medium='+medium+'&utm_campaign='+campaign;
createCookie(cookie_name, cookie_value ,cookie_duration)
} else {
var old_utms = readCookie(cookie_name)
var source = /utm_source=([^&]+)/g.exec(old_utms)[1]
var medium = /utm_medium=([^&]+)/g.exec(old_utms)[1]
var campaign = /utm_campaign=([^&]+)/g.exec(old_utms)?/utm_campaign=([^&]+)/g.exec(old_utms)[1]:undefined
fbq('trackCustom','UTMs',{'Source': source ,'Medium': medium, 'Campaign': campaign })
}

}

}


// Source : https://www.quirksmode.org/js/cookies.html ///
function createCookie(name,value,days) {
	if (days) {
		var date = new Date();
		date.setTime(date.getTime()+(days*24*60*60*1000));
		var expires = "; expires="+date.toGMTString();
	}
	else var expires = "";
	document.cookie = name+"="+value+expires+"; path=/";
}

function readCookie(name) {
	var nameEQ = name + "=";
	var ca = document.cookie.split(';');
	for(var i=0;i < ca.length;i++) {
		var c = ca[i];
		while (c.charAt(0)==' ') c = c.substring(1,c.length);
		if (c.indexOf(nameEQ) == 0) return c.substring(nameEQ.length,c.length);
	}
	return null;
}

function eraseCookie(name) {
	createCookie(name,"",-1);
}
</script>
Step – 2: Implement Tag Sequencing
Step – 3: Trigger on All Pages
Step – 4: Verify using Facebook Plugin
Here, I have landed on site via google search
Then, I landed on site via facebook ads
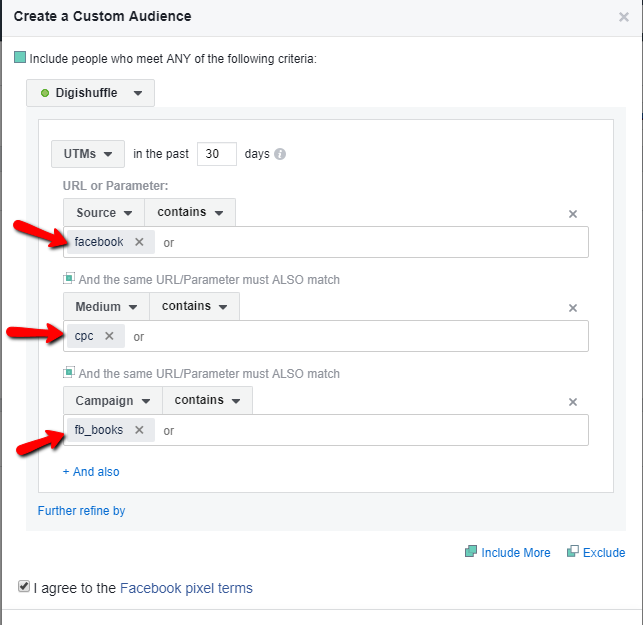
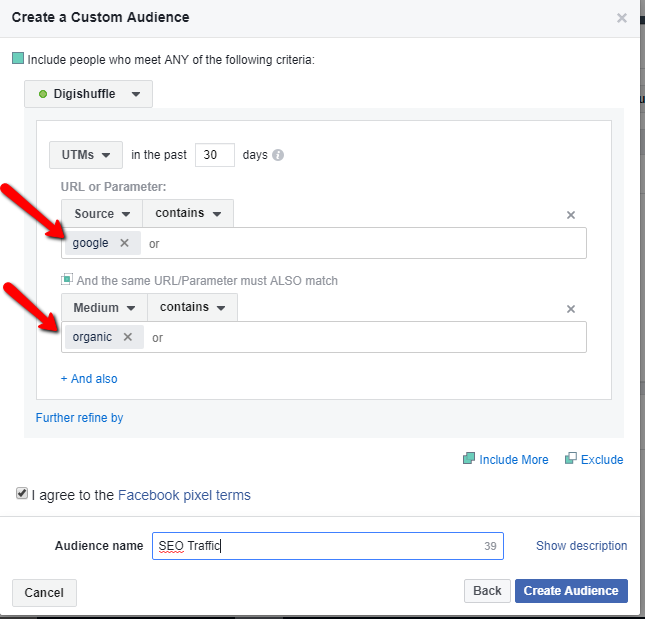
Step – 5: Create Custom Audiences
- Users who came via Facebook Campaign.
- Users who came via google organic
6.) Video Tracking
We can now track embedded videos on websites within seconds. Thanks to the new feature in GTM.
Here, we’ll track 3 parameters, namely
- Video Title
- Video Percentage Watched
- Video Current Time
Step – 1: Configure Video Variables in GTM
Go To GTM > Variables > Enable Video Title, Video Current Time, Video Percecntage.
Step – 2: Create Video Trigger
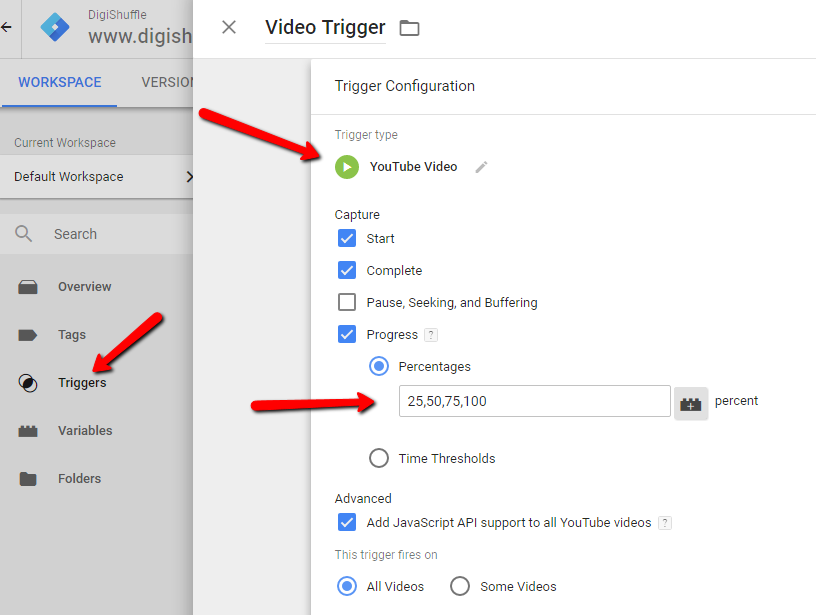
Create Video Trigger with the following configuration. (change as needed)
Step – 3: Create Custom HTML Tag
<script>fbq('trackCustom','VideoWatched',{'Title':{{Video Title}},
'Video Percent':{{Video Percent}},'Video Time':{{Video Current Time}}})</script>
Step – 4: Implement Tag Sequencing
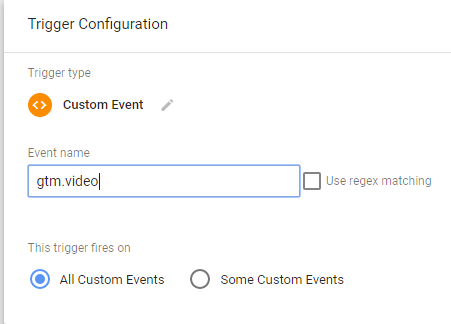
Step – 5: Fire Tag on Video Event
Create a custom event trigger ‘gtm.video’
Step – 6: Verify the Tag via Facebook Plugin.
Summary:
- Facebook has a very large audience base which is useful for remarketing.
- It has very little segmentation functionalities for remarketing.
- Make sure to verify the above events after setup & also change them as per your niche.
- Implement a combination of events to create more powerful Remarketing Lists. Eg: Organic users with LTV > 500$, etc
- Feel free to add/discuss new ideas in comment. 🙂
More Articles:
Automated Cost Data Import – Facebook To Google Analytics
Track Facebook Like, Comment & Share in Real Time – Google Analytics.
Dynamic Remarketing Code Setup – Google Tag Manager & Analytics
Very Good Post about Facebook.!!!!
Keep more high quality post coming!!!
Thanks a lot @neowireless:disqus 🙂
Hi, Ritwik:
What is the difference of this Pv_per_user and PageviewCount in your last article? how do you see it is the same user? There is no related code in that. I can see that only the expriary date of the two cookie are different. pv_per_user is collecting pageviews in very long time.