Last Updated on May 25, 2019 by Ritwik B
Setting up a Facebook tracking pixel on your website might be an easy task…
But are YOU sure that the pixel tracking has been set up correctly, no double counting, no errors, every page is firing the tag correctly as expected?
If you’re…
- Trying to set up events pixels.
- Trying to setup pixels on a SPA (Single page application) websites.
- Using Multiple Pixels on your website.
- & so on…
then MOST PROBABLY you’ve done it WRONG or willing to do it.
In this article, we’ll be focusing on the CORRECT ways to set up the facebook tracking pixel & also some of the advanced pixel configurations.
Let’s start with a little bit of context on the workings of the facebook pixel… Feel free to jump to any section.
Index
1.) What is Facebook Pixel & How Does It Work?
Facebook Pixel is a javascript code which sends the data to the FB servers, whenever the user performs a specific action on your website.
So, how does facebook transfers the data…? It’s simple…
It sends the GET request to the URL https://www.facebook.com/tr/ with query parameters. (As most of the web tracking tools do)
By installing the pixel & tracking the user data, you can now:
- Re-market the user with relevant ads
- Increase your sales
- Analyze the results of your ads & optimize your ads.
Now, let’s understand the Facebook pixel code structure. It mainly consists of
- Base Pixel – It will fetch the fbevents.js file.
- Initialize ‘fbq’ – It will fetch Initialize ‘fbq’ parameter.
- Advance Matching Pixel – Used for advanced matching.
- Fire The Event – Sends user data to Facebook servers.
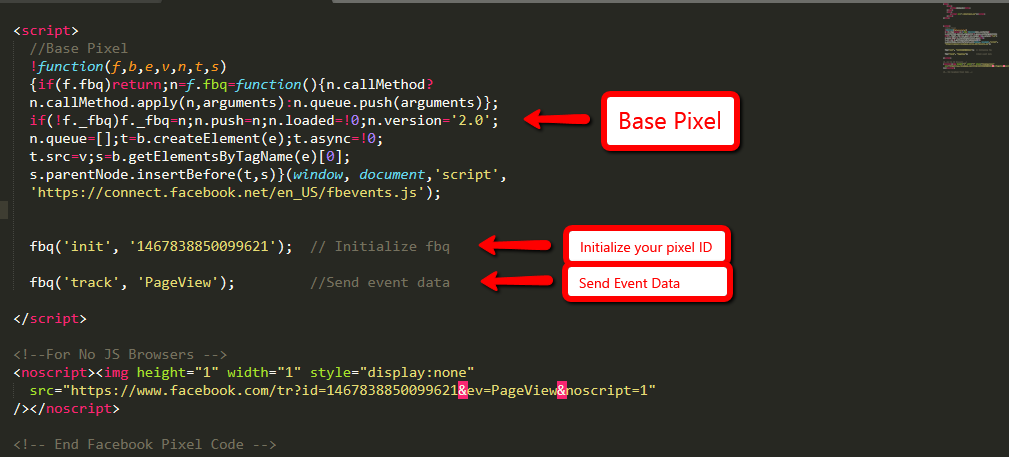
CODE STRUCTURE:
Base Pixel:
!function(f,b,e,v,n,t,s)
{if(f.fbq)return;n=f.fbq=function(){n.callMethod?
n.callMethod.apply(n,arguments):n.queue.push(arguments)};
if(!f._fbq)f._fbq=n;n.push=n;n.loaded=!0;n.version='2.0';
n.queue=[];t=b.createElement(e);t.async=!0;
t.src=v;s=b.getElementsByTagName(e)[0];
s.parentNode.insertBefore(t,s)}(window, document,'script',
'https://connect.facebook.net/en_US/fbevents.js');
It is the common code which needs to be placed before fbq(‘init’) & fbq(‘track’) functions else simply your code will NOT WORK.
This base code will simply fetch the fbevents.js file by sending GET request to https://connect.facebook.net/en_US/fbevents.js.
Initializing Pixel ID:
fbq('init', '1467838850099621');
This code will simply configure your code to the track events for the mentioned pixel ID. It will do so by sending GET request to https://connect.facebook.net/signals/config/1467838850099621?v=2.8.47&r=stable.
Fire An Event:
fbq('track', 'PageView');
This code fires an event & sends data to the FB servers via query parameters. It will send GET request to https://www.facebook.com/tr/
Some of the query parameters are:
id: 1467838850099621 (Pixel ID)
ev: PageView (Event Name)
dl: https://www.digishuffle.com/ (Page URL)
rl:
if: false
ts: 1556212685854
sw: 1366
sh: 768
v: 2.8.47
r: stable
ec: 0
o: 28
it: 1556212675382
coo: false
rqm: GET
dt: epl1dox76bowbfy9fosvka8hs8pr5l7u
You can see the entire process in your console which can also help you to debug the code if any issues.
NOSCRIPT Code
<noscript><img height="1" width="1" style="display:none"
src="https://www.facebook.com/tr?id=1467838850099630&ev=PageView&noscript=1"
/></noscript>
Lastly, the code in the <noscript> tag will fire only if the browser has disabled the JS.
Advanced Matching Code (Optional But Recommended)
While it is optional to implement advanced matching facebook pixel but highly recommended by facebook to use it.
Some of the benefits of implementing Advanced matching in facebook pixel are:
- Improve the performance of your ads by increasing your custom audience size.
- Attributing more conversions
- Better optimization
- Higher reach for your re-marketing campaigns.
There are 2 ways to implement it:
- Manual Advanced Matching Method
- Automatic Advanced Matching Method
1.) Manual Advanced Matching Method:
You’ll need to edit the “Initialize Pixel ID” code & add the customer data. Here’s how you can do it:
Change
fbq('init', '1467838850099621');
To
fbq('init', '1467838850099621', {

em: '{{_email_}}',

ph: '{{_phone_number_}}',

fn: '{{_first_name_}}'

....

}));
2.) Automatic Advanced Matching Method:
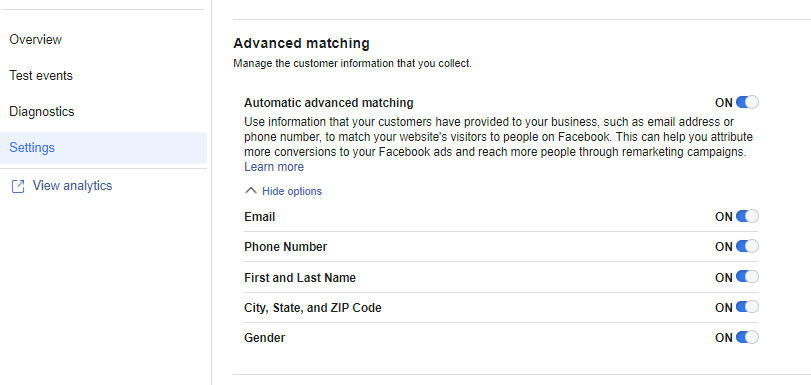
Facebook has come up with the Automatic Advanced Matching Technology that enables businesses to use their current pixel set up (no additional code required) to associate website text fields, such as email addresses, with corresponding events.
The process is much simpler here…
-
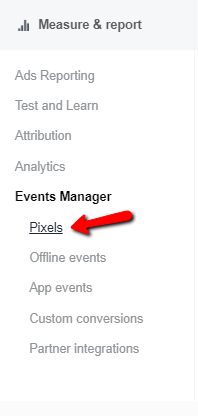
You can go to the Events Manager > Pixel.
-
Select the pixel
-
Go To Settings > Enable Automatic advanced matching
-
Select the specific parameters that you want to send from your website.
(NOTE: As per Facebook, Select Email Addresses & Phone Numbers for the BEST results.)
Now that you know the basic workings of the facebook tracking pixel, let’s move onto the setup part.
2.) How To Install The Facebook Pixel The Proper Way?
There are many ways to install the facebook tracking pixel on your website but here we’ll be looking at
- Manual Implementation Method &
- GTM Method
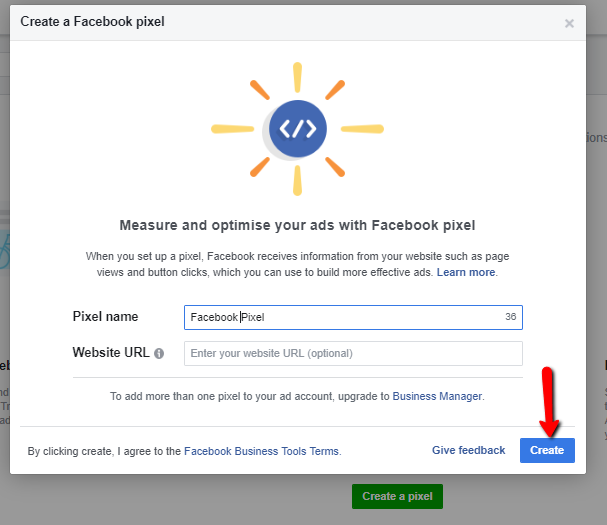
Firstly, you’ll need to create the Facebook pixel (if you haven’t done so.). You can go to facebook event manager & click on create pixel.
Manual Implementation Method:
Once you copy the code, you’ll need to paste it BEFORE CLOSING OF THE HEAD TAG. If you’re using 3rd party CMS such as
- Shopify
- WooCommerce
- Magento
- Opencart
- Leadpages
- & so on…
You can use their respective UI to paste the code in the head tag Or select ‘Connect a Partner platform’ during the Facebook pixel setup.
GTM Method:
Facebook has now made it very easy for the user’s using 3rd party CMS or tag management. So, if you use Google Tag Manager then you can simply follow the steps mentioned by facebook.
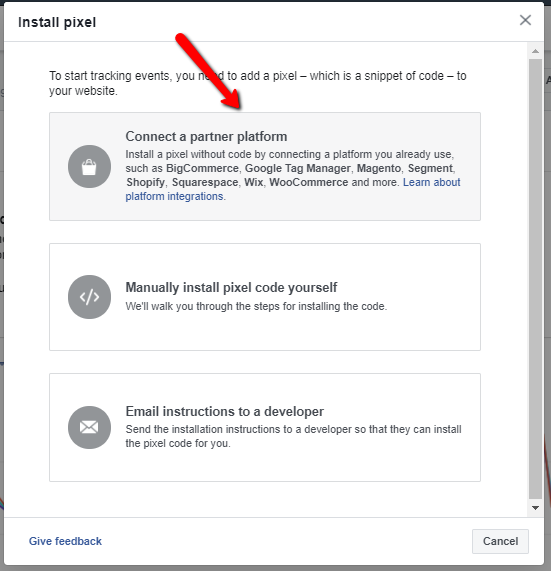
While creating a pixel, simply select the option names “connect a partner platform“. Then you can select Google Tag Manager from the list.
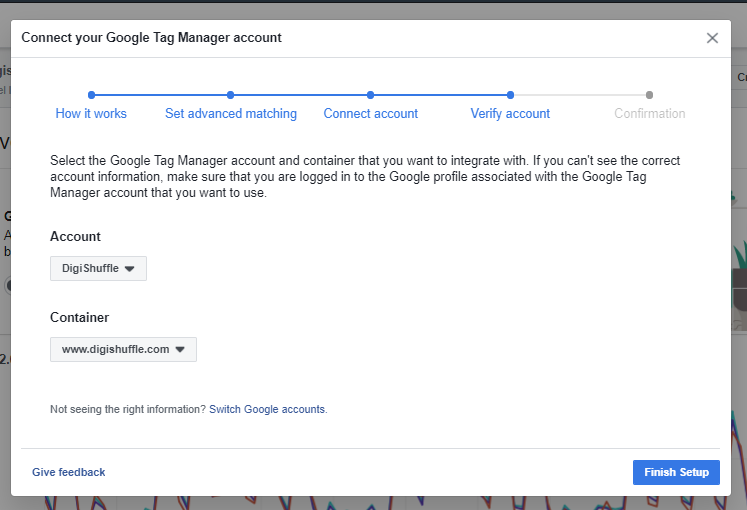
- Authorize your Google Tag Manager account.
- Select the account & container.
- Click on Finish Setup

& That’s it.
Now once you log into GTM, you can see the facebook pixel published tag.
3.) Installing Multiple Facebook Pixel On Website
There might be a situation where a company hires 2 different agencies to handle facebook campaign with different goals (Branding & Direct Sales)
In that case, a need will arise to place multiple pixels for different accounts on the same website & the normal event tracking code might send the event data to the wrong accounts.
Here’s what you can do…
Facebook has introduced 2 functions (features) which can help you avoid the conflict.
- trackSingle – You can use it to fire standard events
- trackSingleCustom – You can use it to fire custom events.
Here’s an example…
BASE PIXEL
fbq('init', '<PIXEL_A>');
fbq('init', '<PIXEL_B>');
fbq('track', 'PageView'); //fires PageView for both initialized pixels
// Fires the standard event - Purchase for Pixel A
fbq('trackSingle', '<PIXEL_A>', 'Purchase', {
value: 4,
currency: 'GBP',
});
// Fires the custom event - ButtonClick for Pixel B
fbq('trackSingleCustom', '<PIXEL_B>', 'ButtonClick',{
"name": "Subscribe"
});
If you are setting it up via GTM, you can utilize the same code in the facebook event tags.
4.) List Of 30+ Facebook Pixel Events That You Must Use. (To Create Custom Audiences & Conversion)
Here is the giant list of Facebook events which you can use it on your or client’s website.
Standard Events
- ViewContent
- AddToCart
- AddToWishlist
- InitiateCheckout
- AddPaymentInfo
- Purchase
- Lead
- CompleteRegistration
- Search
- Contact
- CustomiseProduct
- Donate
- FindLocation
- Schedule
- StartTrial
- SubmitApplication
- Subscribe
Custom Events:
- Outbound Link
- Internal Links
- File Download Links (PDF/CSV/MP3, etc)
- Button Clicks
- Image Clicks
- Image Hovers
- Form Submits
- Scroll Tracking
- Time On Page
- Pages / Visits
- User Lifetime Value
- Pageviews / User
- Element Visibility
- Source, Medium & Campaign – UTMs – First Attribution
- Source, Medium & Campaign – UTMs – Last Attribution
- Video Tracking
Lastly...
Make sure to use Facebook pixel helper for debugging purposes. You can even use the browser console to see if the event requests are getting sent successfully.
And… do check out the events lists & let me know if any issues.
Do you have an example of an event code that is being redirected through javascript?
can we track exact date and time as custom event